Wednesday, July 27, 2011

Chocolate Rum Truffles

Any one that knows me will tell you that I love chocolate...


Like a lot.  It's right up there with shoes and pedicures (no joke). And though this means I have to work out whole bunches to allow for such a habit, its completely worth it.


Over the past couple of days I've been preparing for my new job - teaching hormone-raging, prepubescent 7th graders science. The anxiety the preparation brings can lead to a few things: alcoholism, compulsive shopping, or chocolate bingeing. Yesterday I decided to go for the chocolate, so I found this recipe for truffles. 

Making truffles is surprisingly easy. However, you do need good chocolate; your truffles are only as good as your chocolate. 

I mixed chocolate because I already had a few ounces of semi-sweet baking chocolate laying around. For the last 4 ounces I bought some Ghirardelli semi-sweet baking chocolate.  Very yummy, and especially awesome when trying to impress the in-laws... ya, did I mention we're driving to Nashville today??


The first thing you need to do is chop up all the chocolate.  Make sure it's at room temperature when you begin because that will not only make it easier to chop, but it will melt faster as well.  I don't know... my Granny keeps her baking chocolate in the freezer right next to her whipping cream, and so do I (not the whipping cream), so if you are like us, take it out of the freezer. 


This was the part I was afraid I was going to mess up.  Anytime I have to watch something carefully so it barely gets hot and doesn't burn, I get nervous.  


Thankfully it came off without a hitch.  You only need to heat the cream and butter till the butter melts and the cream just begins to boil. So don't leave it, and keep stirring it. This should only take a few minutes anyway.


Letting the hot cream sit on the chocolate for awhile is a good idea.  This lets the chocolate melt a bit before you stir.  Those are seriously the only three ingredients for basic truffles. I was excited considering I usually have these things sitting around!


Doesn't it look amazing? I could have just eaten it this way, oh wait... I did! It's very rich, but it needed one more thing...


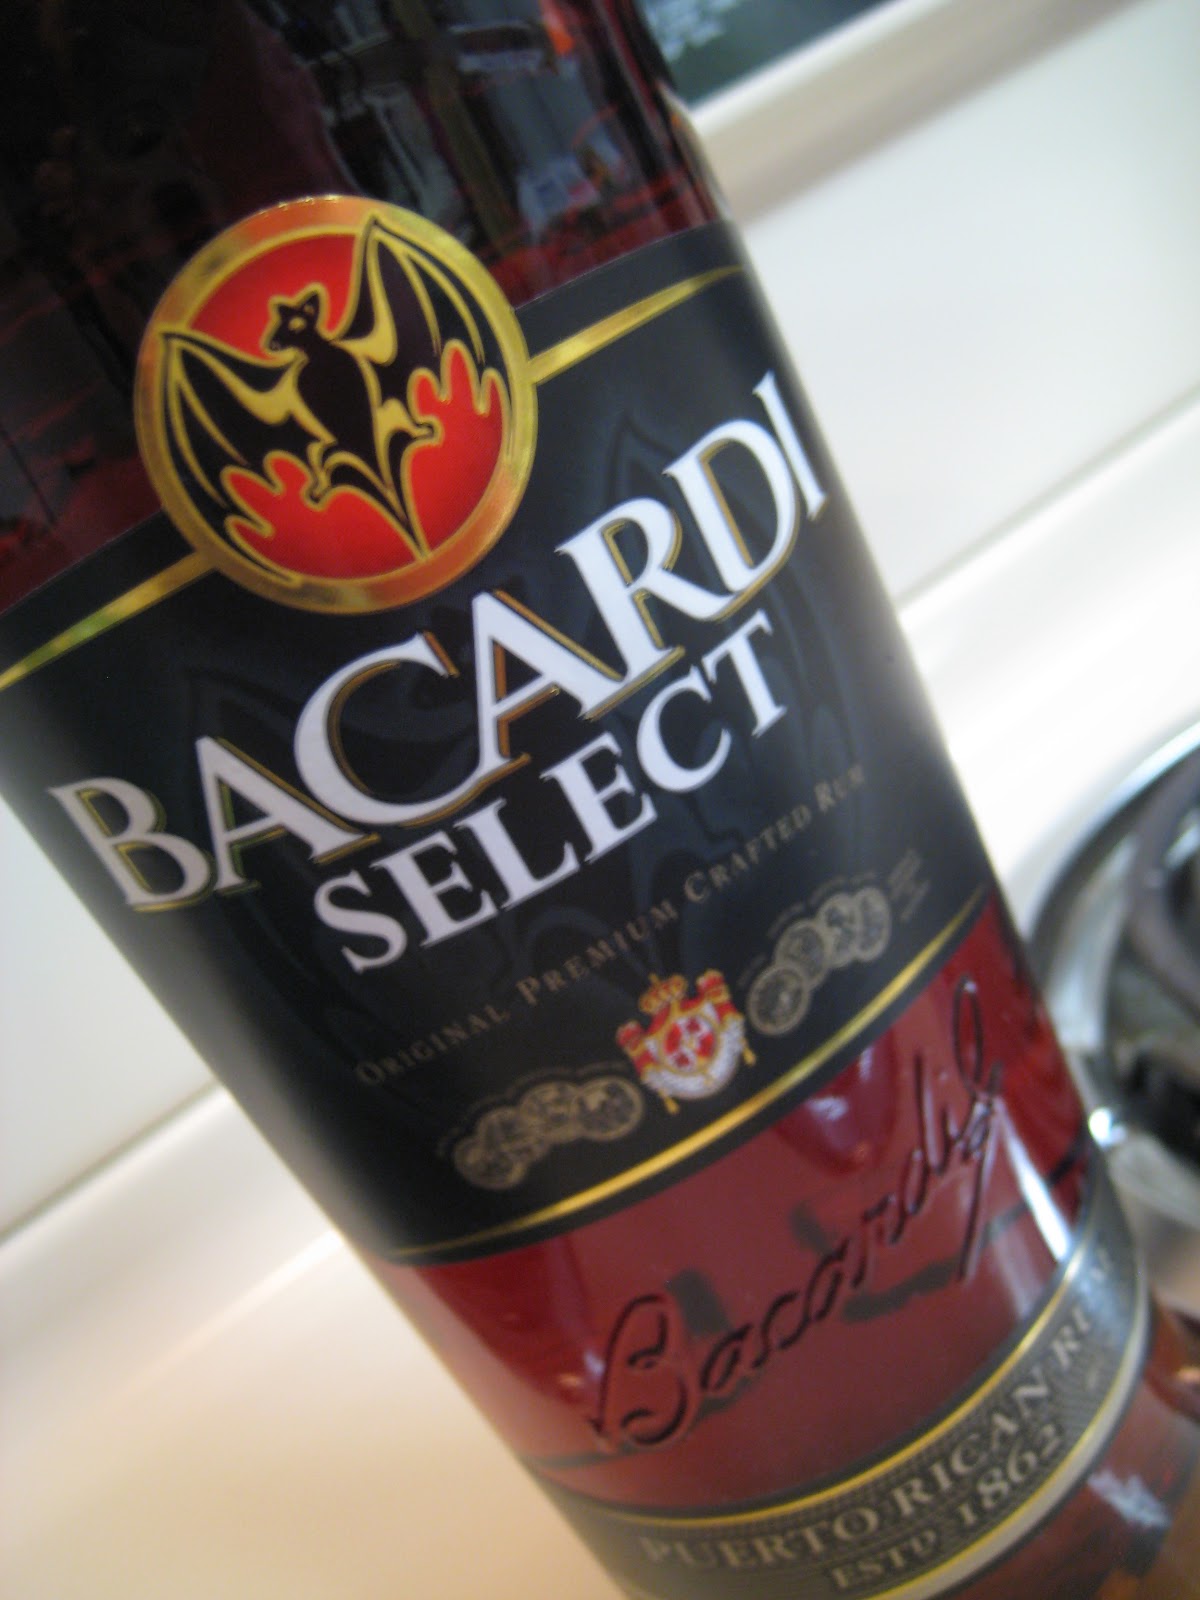
A magical ingredient that was supposed to (and will) accompany some Mahi Mahi very soon: Puerto Rican rum.


The unfortunate part of this whole process (which was supposed to relieve stress mind you) was that I do not own a melon-baller or a tiny ice cream scoop (who would want an ice cream scoop that small anyway?).  All I had was two hands (still do) and a teaspoon. 


So... I know they are ugly (see my fingerprints??), but what's more important than eating with your eyes?

Eating with your mouth, duh. 


And I most certainly did.  They are sweet, creamy, and very rich! They also have delicious rum in them. If your not into that kind of thing - you should be. 

I'm kidding, you can add vanilla into the melted chocolate instead. 

I rolled some of them in powdered sugar... I needed a melon-baller sooooo badly.  The chocolate was melting in my hands as I tried to roll them.  So when they hit the sugar, it was absorbed and they ended up looking like dalmatian truffles instead... 


Oh well, live and learn, and then go buy a melon-baller.  

As far as I'm concerned they tasted amazing.  A romantic treat, but also good for nursing the nerves that follow making up classroom rules for crazy teenagers who already know everything anyway... 

Chocolate Rum Truffles (recipe courtesy of JoyofBaking.com)

1/2 Cup whipping cream (you can also use heavy whipping cream if this isn't rich enough for you)
2 tablespoons butter, cut into small pieces
8 oz. good semi-sweet chocolate (or bitter sweet chocolate)
2 tablespoons alcohol of your choice (rum, Cognac, Grand Marnier, bourbon, Kahlua... )
Cocoa powder, confectioners sugar, toasted coconut, or toasted nuts to coat the outside 

1. Cut up chocolate into small pieces.  Be sure the chocolate is at room temperature.

2. Warm butter and whipping cream on the stove for a few minutes, stirring constantly, till the butter has melted and the cream is just beginning to boil.

3. Pour cream mixture over the cut up chocolate, and allow to sit for a moment.  Then stir the chocolate and cream mixture till it becomes smooth.  If the chocolate has not completely melted, put the bowl in the microwave for 20 seconds then stir again.  Repeat this till the chocolate melts completely and the chocolate is smooth. 

4. After the chocolate has completely melted, add 2 tablespoons of whatever alcohol you would like, or 1 tablespoon of vanilla and stir till liquid is fully incorporated.   

5. Put the chocolate in the fridge for an hour or two till the chocolate has solidified again (you could even leave it in there over night).

6. Use a melon-baller or small ice cream scoop to form small chocolate truffles.  I used my hands to form them into balls, but they melt... it was very messy. You may want to place them on wax paper at this point and put them back in the fridge to firm up again. I didn't do this, but it may help the coating not look so beat up when you roll them in it.

6. Roll in desired coating (I used powdered sugar and cocoa.)

Enjoy!

Monday, July 25, 2011

Granny's House

I don't remember a time when going to Granny's house didn't fill me with joy and excitement.  My grandparents have a house that sits on several wooded acres in South Mississippi, and every summer when I was younger we would drive over for a few weeks to give my parents a break.

Nowadays, I also make the drive for a break, and some incredible food.

This past weekend was no different!  Granny made a moist German chocolate cake and a wonderful Sunday lunch.

P.S. Granny stops for nothing! So your getting a lot of "action" shots.


Check out that old-school mixer. The bowl spins too, and the on, off, mix, fold, whatever settings are on a dial on the back. I thought it was cool... and it has about 20 more settings than mine. 


I'll have to add the recipe later, because she was bookin' it. I managed to catch the mixer off for just a few seconds before she got back to add more buttermilk. 


Observe her perfect egg whites...


I had to literally run to keep up.  Thankfully, I was in the right place at the right time to get some of that super healthy batter and a look from Mr. Gingerbread that said something like, "what, what, what are you doing?" 


I would have taken a picture of the finished product, but a few things happened. 

1. The cake vanished almost immediately after it was iced (because it was delicious), and 

2. Granny wrapped up the last little bit to send home with us; unfortunately when it rains at Granny's all the ants come up and get in the cars. So when we got home last night, we realized the only reason we hadn't been eaten alive was because the ants realized how awesome that cake was. 


Something else you should know about Granny is that she *must* cook for everyone when they come over, and it can't be some little weenie lunch either. Especially on Sunday.

So she made a "little" lunch.


By a "little" she means rolls, roast with vegetables, corn, potatoes, salad, fried okra, black-eyed peas, home-made gravy, and cake!


The fried okra is easily my favorite side.  It's so good, and actually not as bad for you as the full-on fried okra you would expect.


This is a normal Sunday lunch as Granny's, and I never get tired of it. It's the quintessential home cooked meal. It really does have love in it.  (Notice there's no room for salad on that plate!)

Granny and Grandaddy are extremely generous and warm.  You sit around there long enough and they will tell you all about how things used to be.  How she used to watch her mother and grandmother make the same types of foods when she was growing up.  How he used to skip class for a smoke in the boys' bathroom, till Granny set him straight! 


I love my grandparents, they are two of the most welcoming people.

Just don't bring up medical issues around Granny, you may get more than you bargained for.  

(P.S. Granny said if I married Mr. Gingerbread she would give me these dishes. I'm still waiting, aren't they cute??)

Friday, July 22, 2011

Chocolate and Peanut Butter Whoopie Pies

I love chocolate and peanut butter (like a lot), especially when they are together.

They really do have the perfect marriage... we could all learn something from chocolate and peanut butter.

So, I tried something I have always wanted to - chocolate and peanut butter whoopie pies! They are a cakey, cookie sandwich with icing filling the middle... like your own personal cake. This is what the world is coming to, our own personal little cakes for everywhere we go!


Being full of the American spirit, it has a ton of butter in it. (yes!)

This recipe (a little misleading) said it only made 6 whoopie pies.  Well, I was going to send them to Mr. Gingerbread's office so he could share, and 6 wasn't going to cut it.


So I upped it to 10, and oh man... it makes waaaaaay more than that.  Maybe they wanted whoopie pies the size of a dinner plates. 


I ate a lot of this stuff... which I know is probably not safe, but it was soooo good! I really like that coco- chocolate deliciousness, and I knew I wasn't going to make 30 whoopie pies... Just didn't want to waste it, we are in a recession.


The recipe said peanut butter icing would be good, and it is... but I think next time its going to be cream cheese! I used natural peanut butter because that's what I had, I think a sweeter (not-natural?) type would be better, as long as it's creamy.


This recipe makes the sandwiches more like cookies than soft cake.  So if you like a little crunch, this is perfect! And all that with a creamy, peanut butter filling.


Everyone should experience whoopie pies.  Just ask Paula Deen.  It was on her show that I first saw these a couple of years ago. And what makes them even more awesome?? You can make them into your favorite type of cake!


So next time it's probably going to be a red velvet whoopie pie with delicious cream cheese frosting! 

Brace yourself!

Chocolate Whoopie Pies with Peanut Butter Frosting (Courtesy of Allrecipes.com)
  • For cookies:

  • 2 cups all-purpose flour
  • 1/2 cup unsweetened cocoa powder
  • 1/2 cup hot water
  • 1 teaspoon vanilla extract
  • 1 teaspoon baking soda
  • 1 cup white sugar
  • 1 cup butter
  • 1 egg

  • For Peanut Butter Frosting:

  • 1 tablespoon butter
  • 1 3/4 cups confectioners' sugar
  • 1/4 cup peanut butter
  • 1/2 cup milk

  • 1. Cream together 1 cup of the butter or margarine and the egg. Add 1 cup white sugar, vanilla and hot water. Stir in the flour, cocoa, and baking soda and mix well.  (I sifted the dry ingredients together so that they were nice and mixed before adding them to the wet ingredients.) 

  • 2. Drop from a teaspoon onto cookie sheets and bake at 375 degrees F (190 degrees C) for 10 to 12 minutes. Sandwich cookies together with Peanut Butter Frosting. I did 10 minutes and they came out fine, but like I said in "New Fridge", my oven is about a billion degrees too hot.

  • 3. To Make Peanut Butter Frosting: blend 1 tablespoon butter and peanut butter. Stir in confectioners' sugar and add enough milk to make frosting soft enough to spread. I put a little vanilla extract in mine just to add a little more flavor. Spread between the flat sides of two cookies and sandwich together.

  • Recipe says it yields 6, but probably close to 18 smaller ones. 


Thursday, July 21, 2011

New Fridge!

When the Mr. and I moved into to our cozy (tiny) apartment, we were just excited to get to live together. But as the newly-wed fog began to clear we were able to see that our economic apartment had some...

quirks...

1.  The dish washer only does one, super long wash cycle and always does the dish warmer feature whether you are trying to save money or not.

2. The stove is about 2 billion degrees hotter than what the dial says (it's a dials only oven).

3. The washing machine is about the size of a 5 gallon bucket.

and the most terrifying appliance of all?


The 1980s fridge.... there it is... 

If it looks like I'm starting to hoard... don't be alarmed.  Tuesday the maintenance guys came to my door and said, "Your gettin' a new fridge tomorrow at 9!"  So I cancelled my appointment (because they didn't really check to see if I was even going to be home at that time) and began to move furniture around so we could raise the mammoth. 


I also had to clean everything out of the fridge and "pantry" (which consists of several shelves hanging on the wall directly across from the fridge.. oh apartment living), and move it all out of the way.   


I was actually impressed with how much stuff we can fit in our kitchen without it looking cluttered.


There it goes... let me paint you a word picture... two maintenance guys, one dolly, and one gigantic 80s fridge going down the stairs with only about 2 inches of clearance on both sides... epic.


There's the fridge-shaped gap left in my life.  It took another hour and a half for the floor people to come and put down a new kitchen floor (the old one has had a hole in it since they came and inspected the fridge last week, and yesterday the floor guy tore the flooring in half to see what was under it...)


Thankfully, before the floor guys left, they installed this baby! I am so excited!! It is so clean, and white, and COLD! And (drum roll) it has an ICE MAKER! I feel like I've been living in a time warp with my wimpy ice trays (especially when you forget to fill them and sorry, no ice!)


I christened the new appliance with my favorite magnet, and listened to that ice maker roar!

Tuesday, July 19, 2011

Chicken in a Pot

oh Monday night...

The beginning of the week, grocery shopping, and my personal favorite - menu planning. I love this part.

I really like picking out new things to try, and this week, it's Chicken in a Pot


It's a healthy meal to start off the week; considering the eventual down hill slide of diet despair that will inevitably follow. It's hard to stay motivated... and bikinis are stupid... 


Anyway, this was a really simple and light chicken recipe.  It has a chicken broth (I used low sodium), tomato, and oregano sauce to cook the chicken in. It also provided me with another opportunity to use some delicious Panko! 


Ya... the crust got a little mangled, but that chicken was slippery. And the smell of this stuff cooking more than made up for it! 


I could have eaten it just like that....


I mean, the chicken looked so good, why pour a sauce over that lovely crust?


Thankfully, it called for mushrooms! I heart those little guys.  


By the way, I was having a bit of writer's block today. Then I saw a Charmin toilet paper commercial and realized nothing could be as bad as "we all go, why not enjoy going!"

*awkward*

After 30 or so minutes of bubblin', this yummy chicken and sauce combo was ready to sit next to my not so exciting mixed veggies... Mondays just don't produce good side dishes... or at least that's my excuse. 


It may not be pretty, but the sauce was very good! 

Tonight it's going to be a celebration salad, because I just found out I will be starting my first teaching job in just over a month!!!!!!

Monday, July 18, 2011

Go MEAT!

I'm a carnivore.


The Mr. and I have had very little beef in our lives since we tied the knot.  So when he looks at me on Saturday night and says, "Wanna get some steaks?" I was like, "uh, yes!"


I went to the store and bought these guys and some Montreal seasoning.  Mr. Gingerbread told me to get "Canada" seasoning, soooo I figured Montreal was close enough...


Now of all the delightful, wonderful wedding gifts we received on and around our special day, a grill was not one of them.  Which is ok, because we really haven't got a place for a grill to live right now. (Did I mention it's a one bedroom?)


But I did get one of these! I spent about 5 seconds "googling" how to broil a steak in the oven, and this is what I found, can you see all the smoke?  Ya, that was *almost* a problem. 


The recipe I found said put some oil in the cast iron skillet and heat it up.  Then put the steak in there... My problem, too much oil in there... don't do that, it can be dangerous...  


But the outcome was totally worth my "smoked" eye balls. 

I also prepared what I feel to be the best side for a steak dinner - asparagus (especially when a huge potato with everything on it is probably just as unhealthy as the three cupcakes I had yesterday) 

This is one of my favorite veggies. 


They are so yummy. I believe it was my friend Brittany, who had me over to dinner numerous times when I lived in South Mississippi, that gave me this recipe. 


I probably should have made a third something to go into this meal... 


No, I think I'm good. 

This steak was so tender, and juicy. I like mine medium rare.... my dad says that's gross, but if he had this piece of sha-blam, I think it would change his mind!

The steaks were pretty large.  So we saved half of it for Sunday dinner, a steak house salad!


I didn't have a lot of extra veggies to put on the salad, but crumbled goat cheese, balsamic vinaigrette, cucumbers, and heart of romaine were plenty for this light summer dinner. 


Cast Iron Steak:

1.  Trim and season steaks.  (We used McCormick's Montreal steak seasoning, and 1 - 1 1/2 inch ribeye steaks)

2. Put a tablespoon or so of canola oil in a cast iron skillet, and put it in the oven set to broil at 400 (or 375 to be safer) degrees F.  (Canola oil has a high smoke point, so if you are watching it carefully (unlike me) it shouldn't fill your home with smoke) This won't take long.  

3. While your waiting for the oil to heat up, turn your stove-top burner to high. 

4. When the oil and the cast iron skillet are hot, take it out and put it on the stove top burner (and oh.wow. watch out! It will be SUPER HOT!).   With long tongs place your steak in the skillet.  Cook for about 30 seconds on each side to get a good sear.  

5. Put the steak back in the oven for 2 - 4 minutes.  (I flipped it during this time to get an even cook.)  This will cook it to a medium-rare.   Which as far as I'm concerned is the only way.

Garlic Asparagus

A bunch of asparagus
2 - 3 cloves of garlic
Extra virgin olive oil
Salt and pepper

1.  Clean asparagus.  (I've heard you bend one till it breaks naturally, and that will show you the place where the freshest part of the asparagus begins. Then cut the rest at that place.) Then put the asparagus in a baking dish where most of the asparagus can be seen or spread out a bit.

2.  Mince garlic cloves and add to baking dish.  Salt and pepper to taste, and then sprinkle on the olive oil.  

3.  Toss with your hands till olive oil and other ingredients coat the asparagus.

4. Bake in the oven for 20-25 minutes at 375 degrees F, or until the asparagus is fork tender.  Stir it once or twice while it's cooking.